The Graphics Display Designer X (GDD X) is a visual design tool, which provides user with a quick and easy way of creating Graphical User Interface (GUI) screens for embedded applications on Microchip PIC microcontrollers. GDD X provides a visual interface allowing the user to orientate graphical objects in relation to other objects on a screen. It will allow user to generate the ‘C’ source code of the designed screens with the help of Microchip Graphics Library.


Description
GDD X can be used in two ways
1. As a standalone tool
2. As a plug-in with MPLAB X
GDD X as Standalone Tool
GDD X can be used as a standalone application. That means, it will not be bundled with MPLAB X IDE and can work independently. In standalone mode, GDD X will generate the code for user designed GDD X project and save it in the project’s directory. The generated code needs to be added manually into an MPLAB X or MPLAB 8 IDE project along with the MLA Graphics Library.
GDD X as Plug-in with MPLAB X IDE
Using GDD X as plug-in with MPLAB X IDE is similar to using old GDD with MPLAB 8. GDD X will generate the code for user design and automatically add it to user MPLAB X IDE project. User should install MPLAB X IDE and necessary language tools from Microchip website.
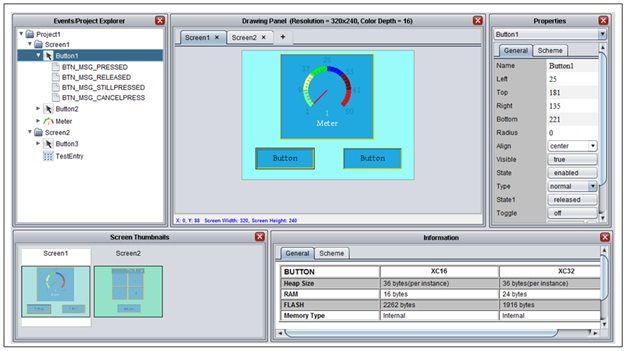
GDD X GUI Overview
Following are the GDD X GUI components
1.GDD X Menu: GDD X menu bar gives all the GDD X options for user to select at the top of the window.
2.GDD X Toolbar: GDD X toolbars provides shortcut buttons for all the menu options.
3.Objects List: This pane consists of the available Graphics Object Layer (GOL) controls and Graphics Primitive Layer (GPL) controls. These controls are also called as Widgets or Objects. These controls can be selected from the list and drawn on the screen.

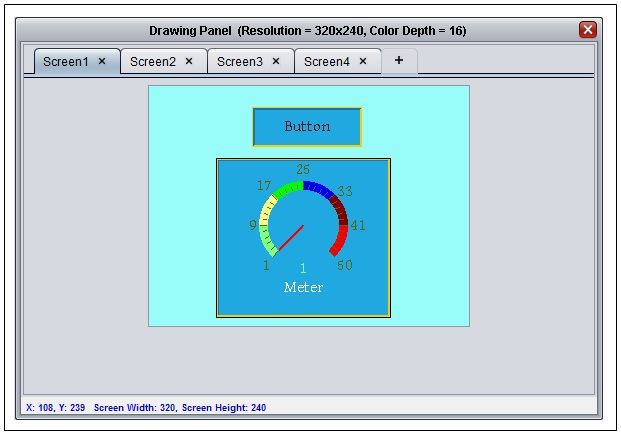
4.Drawing Panel: The GDD X Drawing/Designer pane is the place holder to draw/design the GDD X screen. User can select and draw the GOL and GPL controls on the GDD X screen. Once the design is completed user can generate the source code for the design and these files will be automatically added to the MPLAB X project.
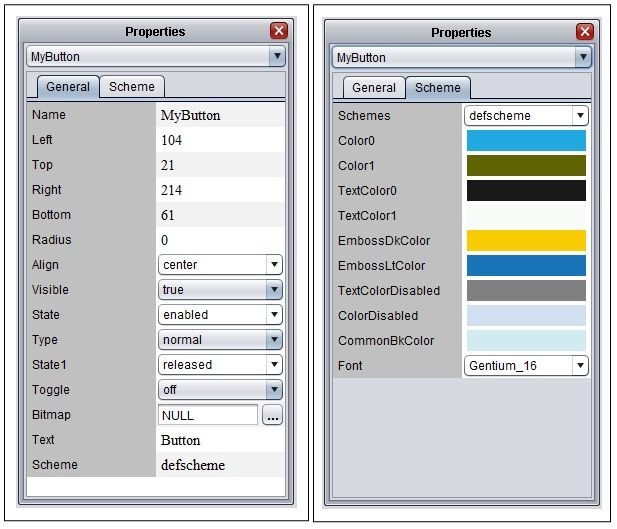
5.Property Window: The Properties pane displays the general properties and scheme properties for the currently selected GOL or GPL controls. New schemes can be created and/or modified. All the scheme parameters are encapsulated under the scheme name.
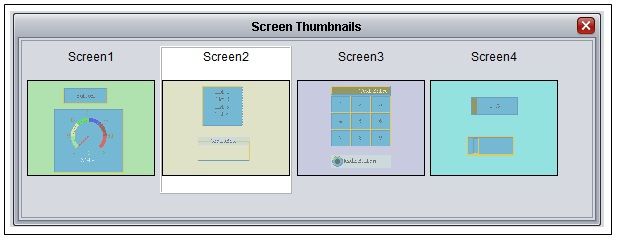
6.Screen Thumbnail: This pane shows the thumbnail views of all the screens of the current GDD X project. Screens in the drawing panel can be toggled from here as well.
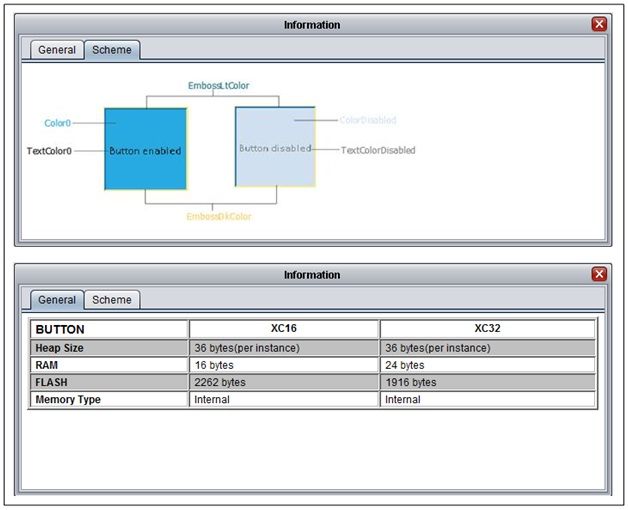
7.Information Box: This box shows the status and context information related to GDD X. Also the general information related to the widgets and default scheme information is populated here.
8.Event/Project Explorer: This pane is a medium to add events to GOL controls. Actions could be added by right clicking on a GOL message inside the widgets tree. Also the custom action source code be added from here. This pane also could be used to select the widgets/screens on the drawing panel.

GDD X provides the following advantages to the developers:
1. Simplifies coding for the GUI screens with an ability to draw, resize and delete screen objects
2. Eliminates the need to manually calculate the X/Y coordinates for on-screen object placements
3. Generates output source files
4. Ability to import various graphical resources, including custom fonts and bitmap images
5. Run as a stand alone tool or a Plug-in in MPLAB X
6. Compatible with Linux, MAC and Windows
Key Features in GDD X:
1. Snap to Grid
2. Auto alignment
3. Cut, Copy, Paste and delete screen objects
4. Change screen background color
5. Copy paste whole screen
6. Code Generation
Advanced feature set in GDD X:
1. Palette support for 1, 4 and 8 BPPs
Apart from regular RGB scheme of representing colors, colors may also be represented using a Color Look Up Table (CLUT) also called Palette table, where there is a table of colors and the color is specified by the index of the table. Depending on the size of the table, the bits used to represent the index will vary. For example 256 entries of RGB (8 bit index), 16 entries of RGB (4 bit index), 4 entries of RGB (2 bit index) and 2 entries of RGB (1 bit index). This scheme is mainly used to save memory and yet not compromising on the picture quality.
Palettes can be used for color depth of 8bpp (256 entries) or lesser and it can be enabled in the beginning of creating any new GDD X project. By default GDD X will provide a palette for all the GDD X screens. User can create their custom palettes (.gpl files) and import it to different screens as well. One palette can be assigned to different screens, but one screen cannot have multiple palettes assigned to it. Procedure of creating custom palettes (.gpl files) for user application is explained in ‘Microchip Graphics Library’ help file.
Once a custom palette is assigned to a screen, all the color schemes of the screen and hence all the colors on the screen changes its color according to the palette used.
How to use Palette in GDD X
GDD X has palette support for 1bpp, 4bpp and 8bpp color depth modes. Follow these steps to use palette in 4bpp mode
1. While creating a new GDD X project, select the color depth as 4bpp and check the “Enable Palette” checkbox in Display Settings.
2. Create a GDD X screen and draw a picture widget on it (default picture is of 4bpp color depth).
3. Generate the code for it and build the MPLAB X project.
4. Observe the displayed screen on the hardware; picture widget will look totally different than the actual picture used.
5. Create a palette file (.gpl file) for that default picture using GRC tool or GIMP tool and save it in your system.
6. Now in GDD X window, go to menu “Settings>>Palette Manager”. A Palette Manager window will open up.
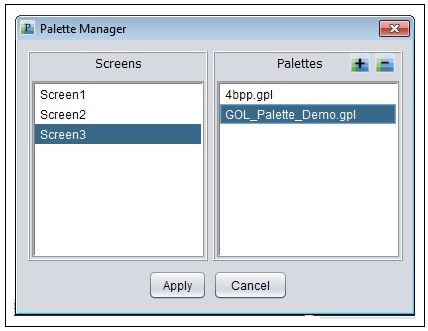
7. Click “Import” button and import the palette file which is created in step 5.
8. Apply this palette file to the screen in the Palette Manager. A dialog box will pop up to enter the new default scheme name; enter any name of your choice.
9. Now generate code again and build the MPLAB X project.
Observe the picture widget on the display screen. It will look exactly same as the original picture.
2. Event/Project Explorer
Event Project explorer shows a hierarchical view of the screens and widgets used in the project.
The following features are supported
1. Selecting a screen by a single left click on the name of the screen.
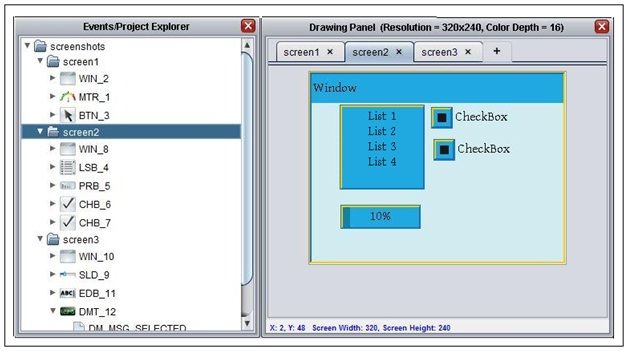
2. Selecting a widget anywhere in the project by a single left click on the name of the widget. If a widget selected is in a different screen, then the drawing panel automatically switches screens to select the widget.
Events Explorer
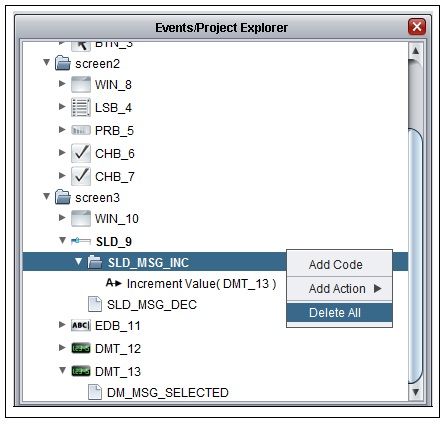
1. Add Code: Empty code can be added by right clicking on a widget’s GOL message and selecting “Add Code” from the options. The screenshot below shows the possible actions to add code.
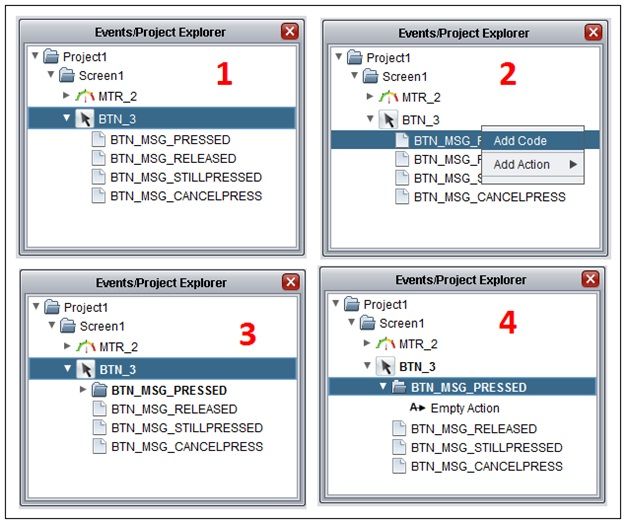
On successful addition of code, a message will be shown in the information panel.
2. Add Action: Actions to a particular widget can be added by right clicking on a widget’s message and selecting “Add Action”. The “Add Action” selection will guide you through the process of associating the action to another widget or to a screen within the project. The process of selecting an action is demonstrated below.
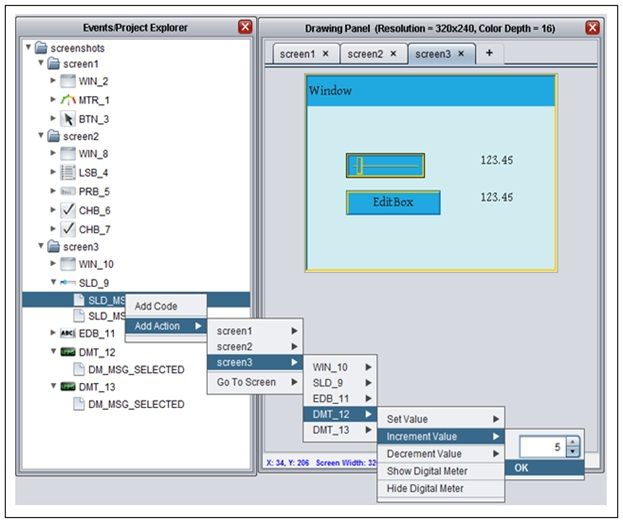
On successful addition of code, a message will be shown in the information panel.
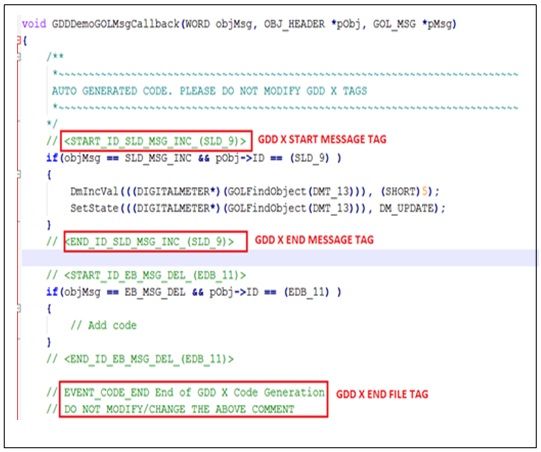
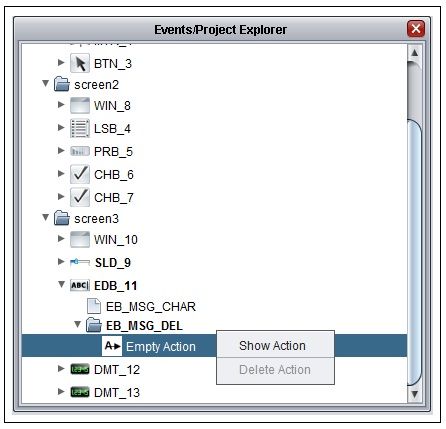
3. Show Action: Events or actions generated for a particular message can be referred back to in the file “GDD_X_Event_Handler.c” by right clicking on the action and selecting “Show Code”.
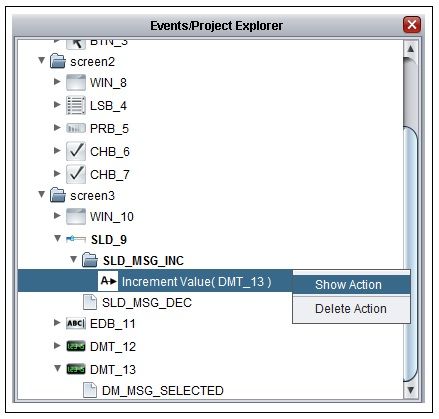
This option is most useful when used in combination with MPLAB X. On selecting “Show Code”, an MPLAB X window opens up the file “GDD_X_Event_Handler.c” at the specific line number.
When GDD X is used as a standalone tool, this option will provide information about the line number of the generated code in the information panel.
4. Delete Action: Events or actions generated for a particular message can be deleted in the file “GDD_X_Event_Handler.c” by right clicking on the action and selecting “Delete Code”.
Key points and use cases of delete action
a. GDD X will only delete the code added by itself during generation of the action. Any modifications to the generated code will be the responsibility of the user.
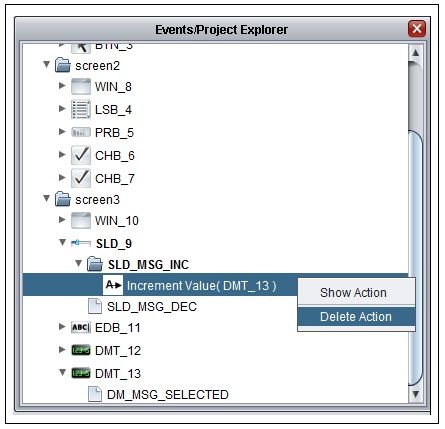
b. The entire message code can be deleted by right clicking on the message (e.g.: BTN_MSG_PRESSED) and selecting “Delete”. This option will not be available if there are no actions generated for the message.
GDDX will warn the user before deleting the code using this option. If user confirms, GDD X will not be able to retrieve it back.
c. GDD X adds commented code tags “ and “” in the generated source file. If user deletes these tags, then GDD X cannot delete any lines of code.
d. “Empty Action” cannot be deleted. To delete an empty action, follow point no 2 above.
3. Import default files
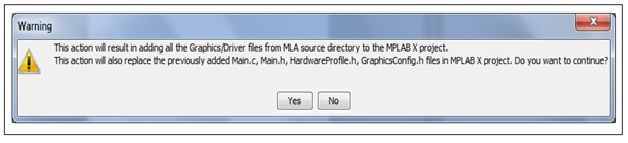
This feature imports the default files into the MPLAB X project tree to compile any graphical applications. The feature is helpful when a user has accidently modified “Main.c, Main.h, HardwareProfile.h and GraphicsConfig.h” files and is unable to compile the code. Along with these files, the user can also reference all the “Common/Board Support Package/Graphics/Drivers” files within the MLA directory.

As seen in the screenshot, user is presented with a list of options to choose from.
The files “Main.c, Main.h, HardwareProfile.h and GraphicsConfig.h” files will be replaced with their respective default files. This will overwrite any user modifications done to the files.
The “Graphics/Drivers” options seen in the dialog only references the files within the MLA directory and will not revert back any user changes. This is not a replacement option, but is merely a reference. It is useful in scenarios where user has manually removed these files from the MPLAB X project and wishes to add them back to the project tree.
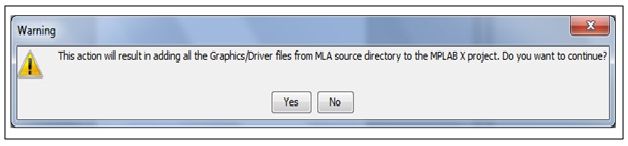
Based on user selection the following pop up confirmations will be seen
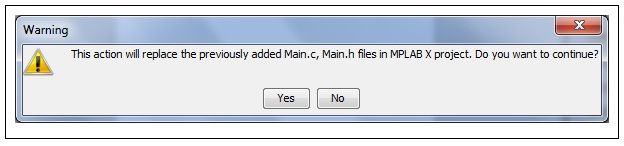
1. Graphics/Driver option is not selected: (assuming Main.c and Main.h are selected)
2. Graphics/Driver option alone is selected
3. Graphics/Driver option and all the files are selected